
React Context API has become an integral part of modern React development, offering an elegant solution to state management that simplifies the process of passing data through your application.
In this guide, we'll explore the React Context API in-depth, providing a solid understanding of its key concepts and demonstrating how to leverage its power for efficient state management.
Prerequisites
Basic Understanding of React
Familiarity with functional components and React hooks.
Node.js and npm (Node Package Manager)
As React evolves and component trees get larger, it becomes harder for developers to maintain state in a single location at the root of the component tree for a complex application.
Passing state down and up the component tree through dozens of components is tedious and bug-hidden. This is described in the diagram below
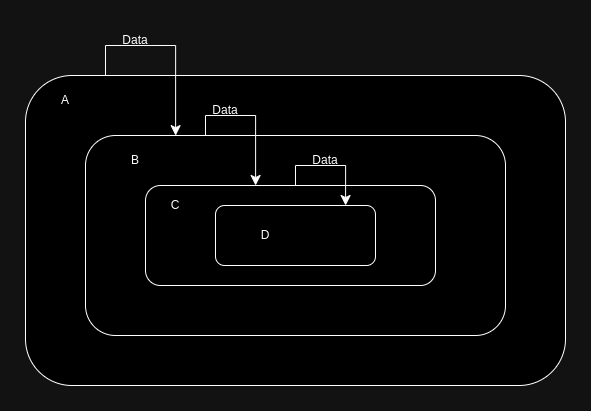
In the above diagram, the components A, B, C, and D are nested. Suppose component D needs data from the root component A. Notice how data is passed from component A down to component D. This data must pass through components B and C even though they might not need the data. This is known as prop drilling.
The React Context API allows you to share data between components without passing it through the entire component tree.
Analogy
In React, Context is like jet-setting for your data. You place data in React Context by creating a Context Provider.
A Context Provider is a React component that you wrap around your entire component tree or specific sections of your component tree.
The Context Provider is the departing airport where your data boards the plane. It is also the airline hub. All flights depart from the airport to different destinations. Each destination is a Context Consumer.
The Context Consumer is the React component that retrieves the data from the Context. This is the destination airport where your data lands.
The following diagram will help you understand the entire concept of React Context.
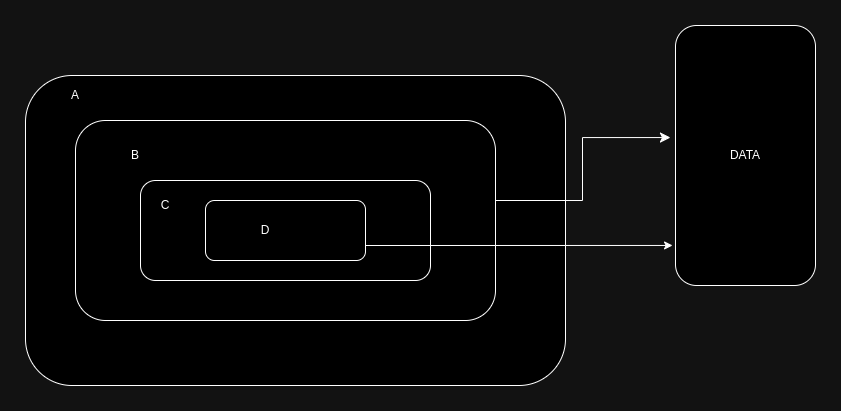
Now, from the above diagram, Components B and D retrieve data from a central repository in this case let us refer to it as the Context. The data does not have to be passed through the entire component tree. See, components A and C do not need the data therefore they do not retrieve it.
The Data is available for all components that may need it. The components retrieving the data are the Consumer components.
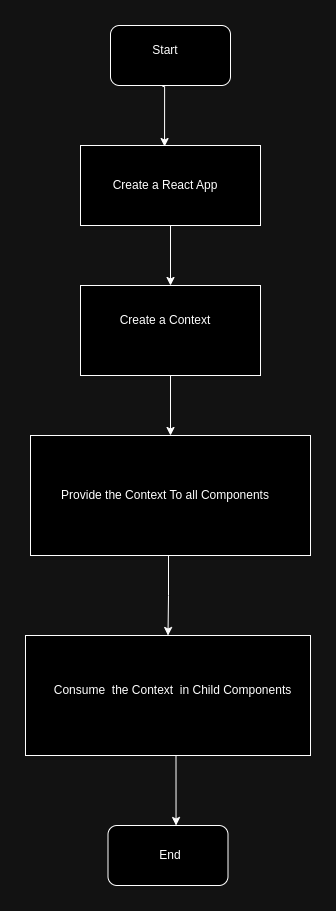
We will follow the below flowchart for easier understanding.
Start
To get started, create your React app and open it in your favorite IDE. I will use Visual Studio Code.
Use the following line of command to create your react app faster.
NPM
npm create vite@latest
Yarn
yarn create vite
Create a Context
Before we create the context, In the src folder, create a folder and name it components
In the components folder create two files
Login.jsxProfile.jsx
The Login.jsx file is a functional component that will contain the following➖
Two states that hold the username and the password.
A function that handles the submitted username and password.
Input fields that accept username and password.
A button to submit the username and password.
This is the code for the Login.jsx file
import React, { useState } from "react";

const Login = () => {

  // State to manage username and password input fields
  const [username, setUsernamme] = useState("");
  const [password, setPassword] = useState("");

  const handleSubmit = (e) => {
    e.preventDefault();
    //logic for logging in.
  };

  return (
    <div>
      <h2>Log In</h2>

      <div>
          {/* Input fields for username and password */}
        <input
          type="text"
          value={username}
          placeholder="username"
          onChange={(e) => setUsernamme(e.target.value)}
        />
        <input
          type="password"
          value={password}
          placeholder="password"
          onChange={(e) => setPassword(e.target.value)}
        />
        <button type="button" onClick={handleSubmit}>
          submit
        </button>
      </div>
    </div>
  );
};

export default Login;
The Profile.jsx file is also a functional component that doesn't do much, only displays the username.
This is the code for the Profile.jsx file
import React from "react";

const Profile = () => {

  return (
    <div>
      <h3>Profile</h3>
      <p>Username : {" "}</p>
    </div>
  );
};

export default Profile;
Import the two files Login.jsx and Profile.jsx in the App.jsx to be rendered.
Your App.jsx file should look as follows
import Login from './components/Login'
import Profile from './components/Profile'

function App() {

  return (
    <>
      <Login />
      <Profile />
    </>
  )
}

export default App
Now let’s proceed to create our context.
Create a folder, name it
contextIn the
contextfolder, create a file namedUserContext.jsx
A context might be for any purpose, therefore you can name it according to it use e.g ThemeContext for handling themes or ProductContext for handling product data. For this guide, we create a context for handling user data that’s why I named it UserContext. Keep it in mind you can name it however you like.
Let me first provide the code for the UserContext.jsx file then explain it for you to understand.
import React, { createContext, useState } from 'react';

// Create a new context named UserContext
export const UserContext = createContext();

// Define a component called UserContextProvider
const UserContextProvider = ({ children }) => {

  // Use the useState hook to create state for the user
  const [user, setUser] = useState(null);

  // Render the UserContext.Provider, wrapping the children components
  return (
    <UserContext.Provider value={{ user, setUser }}>
      {children}
    </UserContext.Provider>
  );
}

// Export the UserContextProvider component as the default export
export default UserContextProvider;
Now, let's break it down step by step:
Import Statements:
- The code starts by importing the necessary modules from React. It imports
createContextanduseStatefrom 'react'. These are essential for creating a context and managing state, respectively.
- The code starts by importing the necessary modules from React. It imports
Create UserContext:
- The code creates a new context named
UserContextusing thecreateContextfunction. This context will be used to share and manage the state related to the user throughout the application.
- The code creates a new context named
UserContextProvider Component:
- The
UserContextProvidercomponent is defined. This component will act as the provider for theUserContext. It takes achildrenprop, which represents the components wrapped by this provider.
- The
useState for User:
- Inside the
UserContextProvidercomponent, theuseStatehook is used to create a piece of state calleduserwith an initial value ofnull. This state will hold information about the user.
- Inside the
UserContext.Provider:
- The
UserContext.Providercomponent is used to wrap the child components. It takes avalueprop, which is an object containing theuserstate and thesetUserfunction. This makes theuserstate and its setter available to any component that consumes theUserContext.
- The
Rendering Children:
- The
childrenprop is rendered inside theUserContext.Provider. This allows the components within theUserContextProviderto access theUserContextand consume the shared state.
- The
Export UserContextProvider:
- The
UserContextProvidercomponent is exported as the default export. This allows other parts of your application to import and use this context provider.
- The
Provide the context to all components
Now let us make the context available to all components. We achieve this with the below code.
import React from "react";
import ReactDOM from "react-dom/client";
import App from "./App.jsx";
import UserContextProvider from "./context/UserContext.jsx";

ReactDOM.createRoot(document.getElementById("root")).render(
  // Wrap the entire application with React.StrictMode
  <React.StrictMode>
    {/* Use the UserContextProvider to provide the UserContext to all components */}
    <UserContextProvider>
      {/* Render the main App component */}
      <App />
    </UserContextProvider>
  </React.StrictMode>
);
Let's break it down step by step:
UserContextProvider:
- Inside
React.StrictMode, theUserContextProvidercomponent is used. This is the provider you created for theUserContext. By wrapping your entire application with this provider, you ensure that theUserContextis available to all components within the application.
- Inside
App Component:
- The main
Appcomponent is rendered inside theUserContextProvider. This means that all child components ofAppand their descendants will have access to theUserContext.
- The main
Consume the Context in child components
The components that consume the UserContext are the Login.jsx and the Profile.jsx files.
The following is the code and explanations of how the two components consume the context.
**Login.jsx:
import React, { useContext, useState } from "react";
import { UserContext } from "../context/UserContext";

const Login = () => {

  const [username, setUsername] = useState("");
  const [password, setPassword] = useState("");

  // Access setUser function from UserContext using useContext
  const { setUser } = useContext(UserContext);

  // Handle form submission
  const handleSubmit = (e) => {
    e.preventDefault();
    // Update the user context with the entered username and password
    setUser({ username, password });
  };

  return (
    <div>
      <h2>Log In</h2>

      <div>
        {/* Input fields for username and password */}
        <input
          type="text"
          value={username}
          placeholder="username"
          onChange={(e) => setUsername(e.target.value)}
        />
        <input
          type="password"
          value={password}
          placeholder="password"
          onChange={(e) => setPassword(e.target.value)}
        />
        {/* Button to submit the form */}
        <button type="button" onClick={handleSubmit}>
          Submit
        </button>
      </div>
    </div>
  );
};

export default Login;
Explanation:
The
Logincomponent uses theuseContexthook to access theUserContext.It maintains local state for
usernameandpasswordinput fields using theuseStatehook.The
handleSubmitfunction is called when the form is submitted, updating the user context with the enteredusernameandpassword.
**Profile.jsx:
import React, { useContext } from "react";
import { UserContext } from "../context/UserContext";

const Profile = () => {
  // Access the user object from UserContext using useContext
  const { user } = useContext(UserContext);

  // Check if the user is logged in
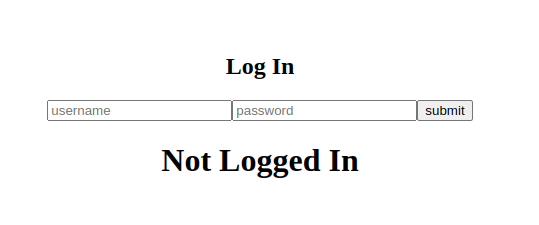
  if (!user) {
    return <h1>Not Logged In</h1>;
  }

  return (
    <div>
      <h3>Profile</h3>
      {/* Display the username from the user context */}
      <p>Username: {user.username}</p>
    </div>
  );
};

export default Profile;
Explanation:
The
Profilecomponent uses theuseContexthook to access theUserContext.It checks if the user object exists in the context. If not, it displays a message indicating that the user is not logged in.
If the user is logged in, it renders the user's profile with the username retrieved from the user context.
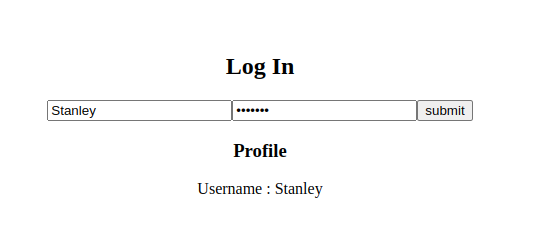
In summary, the Login component updates the UserContext with the entered credentials, and the Profile component retrieves and displays the user information from the UserContext. This demonstrates how components can seamlessly consume and interact with shared state through the React Context API.
Conclusion
In wrapping up our exploration of the React Context API, we've witnessed its transformative impact on state management within React applications.
The dynamic interplay between the Login and Profile components showcased the simplicity and elegance of data transmission through the shared UserContext.
As you continue your React journey, integrating the Context API into your toolkit empowers you to build more modular and maintainable applications.
With its streamlined approach to state management, React Context API eliminates the complexities of prop drilling, allowing for a more cohesive and scalable architecture.
Your understanding of the core concepts of creating a context, providing it through a provider, and consuming it in components, opens doors to efficient solutions for various state-related challenges. Whether it's managing themes, user authentication, or other shared states, React Context API offers a robust and flexible solution.
Thank you for investing your time in exploring this guide. Your commitment to mastering React's state management capabilities positions you for success in your development endeavors.
For more insights and updates, consider subscribing to my newsletter. Stay tuned for future tutorials, and happy coding!


